Most collectors who keep records keep them in a spreadsheet that grew over the years: a tab for guns, one for ammo, maybe one for cans and stamps, each with its own column names. GunCollector reads that file as it is. It works out which of your columns is the make, the serial number or the caliber, shows you every row before anything is saved, and lets you undo the whole import afterwards. Everything in this guide is from a real account: a four-sheet Excel workbook called qa-import-collection.xlsx with a Glock 19, a Daniel Defense DDM4, a Benelli M4, a Noveske SBR, ammo, accessories and NFA items.
1. Choose your file
Click Import on your collection, or go to Settings and click Import… under Import your collection. Then click Choose a file.
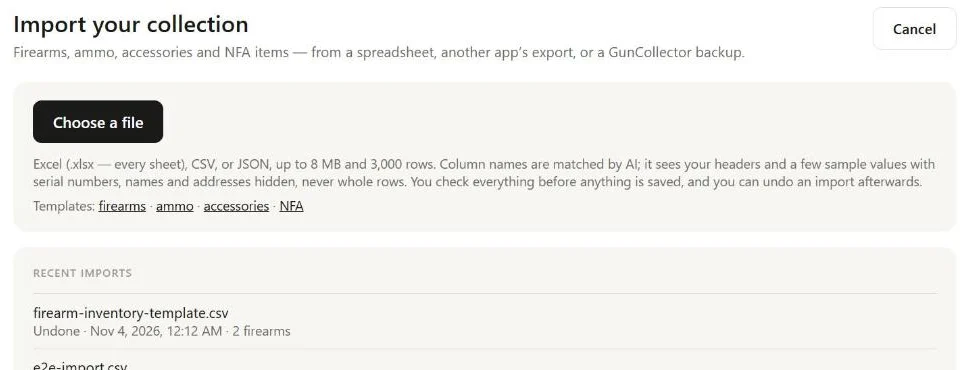
What works:
- Excel (.xlsx). Every sheet in the workbook is read, so a file with separate tabs for guns, ammo and NFA items comes in all at once.
- CSV, from any spreadsheet program.
- JSON, including a GunCollector export (see step 6).
- Another app's export, as long as it's one of those formats.
The file can be up to 8 MB and 3,000 rows. Older formats (.xls, Numbers and .ods) are refused: open the file and save it as .xlsx (Excel) or CSV first.
Starting from scratch? The Templates links under the button download a template for firearms, ammo, accessories or NFA items with the columns already set up. There's more on the firearms one in our free firearm inventory spreadsheet template guide.
What the AI sees. The page says it plainly: “Column names are matched by AI; it sees your headers and a few sample values with serial numbers, names and addresses hidden, never whole rows.” Nothing is saved until you click Import.
Reading a big workbook and matching its columns can take up to a minute.
2. Check each sheet and its columns
Once the file is read, a banner at the top says Columns matched by AI. Check the ones marked AI — change any that look wrong. Under it are notes on anything the AI wasn't sure of. Read them: they point you straight at what to check.
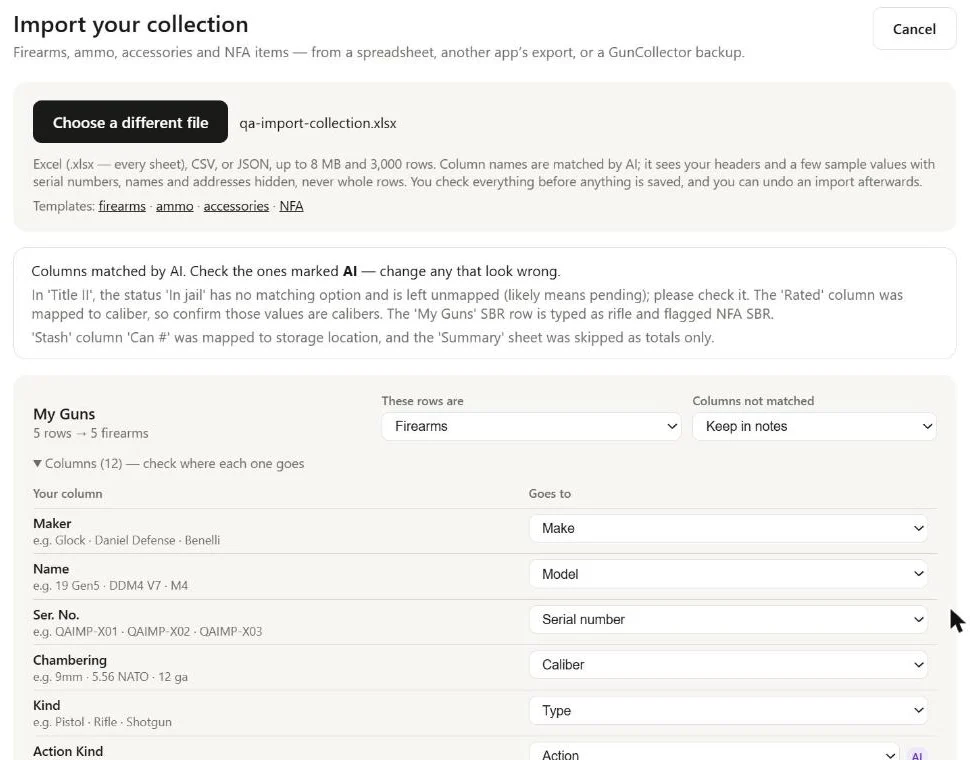
Here the notes say a status of “In jail” on the Title II sheet had no matching option and was left unmapped, that a column called “Rated” was taken as caliber, and that the Summary sheet was skipped because it only held totals.
Each sheet gets its own card, with how many rows it has and what they'll become (5 rows → 5 firearms). Check two settings on each:
- These rows are: Firearms, Ammo, Accessories, NFA items, A mix — a column says which for a sheet where one column says what each row is, or Skip this sheet.
- Columns not matched: Keep in notes puts anything without a home in the item's notes, so nothing is lost. Ignore drops it.
Open the column list to see Your column and where it Goes to, with a few example values from your file under each name. Your own headings don't have to match ours: Maker went to Make, Name to Model, Ser. No. to Serial number, Chambering to Caliber and Kind to Type. Anything marked AI is a guess worth a look. To change one, pick a different field from the list.
3. Check the rows
Below the sheets, every row is laid out in tabs by what it will become. Each tab says how many rows will be imported out of how many there are, and flags any errors.
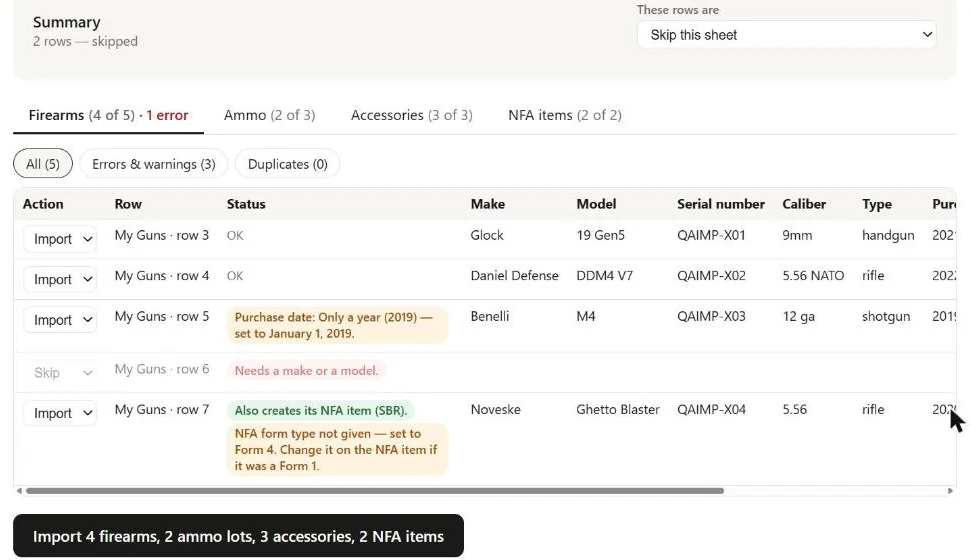
Use the filters to get to the rows that need you: All, Errors & warnings and Duplicates. The Status column tells you what's going on with each row:
- OK: ready to go.
- A warning in yellow: it will import, but something was filled in for you. The Benelli's purchase date was only a year, so it was set to January 1, 2019.
- An error in red: the row can't be imported as it is. Row 6 says Needs a make or a model. and is set to Skip.
- Also creates its NFA item (SBR).: the Noveske is a short-barreled rifle, so importing it adds the firearm and its NFA record together. Its form type wasn't in the file, so it was set to Form 4; change it on the NFA item if it was a Form 1.
- Mounted on and a gun's name: on the Accessories tab, the accessory will be recorded as mounted on that gun.
The Action on each row is Import or Skip. Rows with errors start as Skip.
Fix a row without leaving the page
If a row is wrong or missing something, click Edit on it. The row's fields open under Edit and the row's name; fix what's wrong and click Save row. The row is marked Edited. That's often faster than fixing the file and starting again, and only the web app can do it.
4. Duplicates, and adding rounds to ammo you have
Importing the same spreadsheet twice shouldn't give you two of every gun. GunCollector checks serial numbers:
- Already have: followed by the gun's name means a firearm with that serial is already in your collection.
- Same serial as an earlier row means the file has the same gun twice.
Duplicates start as Skip. If it really is a different gun, switch it to Import anyway.
Ammo works a little differently. If a row matches an ammo lot you already have, with the same caliber, manufacturer, brand, grain and bullet type, you can choose Add rounds to existing lot instead of creating a second lot. The rounds are added to the lot you have.
5. Import, and undo if you need to
The Free plan holds up to 5 firearms. If the file has more new firearms than you have room for, a banner says so (it starts Your Free plan has room for) and tells you how many will be imported and how many won't. Ammo, accessories and NFA devices aren't limited, so those always come in.
When it all looks right, click the button at the bottom. It spells out exactly what will be added: here, Import 4 firearms, 2 ammo lots, 3 accessories, 2 NFA items. When it's done, you'll see Import finished and a line saying what was imported (Imported and the counts), with these buttons:
- A View button for each kind of item added (View collection, View ammo, View accessories, View NFA items).
- Import another file starts again with the next file.
- Undo this import takes it all back out.
Undo asks first: Undo this import? It removes everything that import added. Click Undo import to go ahead, or Keep it. When it's done, it says Everything this import added has been removed.
Spotted a problem later? The Import page lists your Recent imports, each with its file name, date and what it added, and an Undo for each. In the first screenshot, firearm-inventory-template.csv shows as Undone.
6. Export a backup of your own
The same Data section of Settings that has Import your collection also has Export data. Tick the categories you want, or All, and pick one of two downloads:
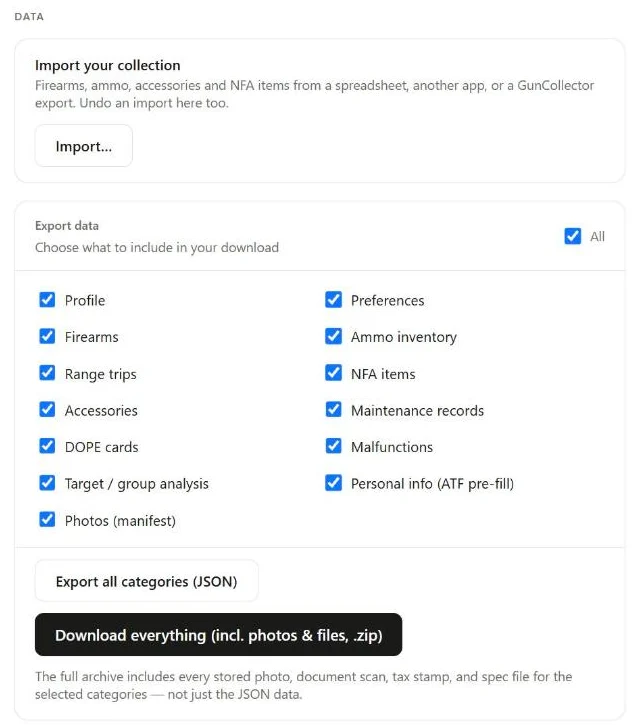
- Export all categories (JSON) downloads guncollector-export.json: your data, in one file. This is the GunCollector backup the Import page mentions. You can import it back.
- Download everything (incl. photos & files, .zip) downloads guncollector-full-export.zip: the same data as data.json, plus every stored photo, tax stamp, document scan and spec file for the categories you picked.
Keep the ZIP somewhere safe alongside your insurance records. It's your whole collection, pictures and paperwork included, in a file you control.
File on your phone? You can import from the GunCollector app for iPhone and Android too, under More → Import. Import Your Gun Collection on Your Phone shows how.